14 January 2021
The importance of taking a proper soil sample
The principle of soil analysis is to determine the average nutrient status of an area and to show the available nutrients in the soil. Once known you can then apply nutrients to bring your soils to optimum fertility. Martina Harrington, Teagasc Beef Specialist advises on proper soil sampling below
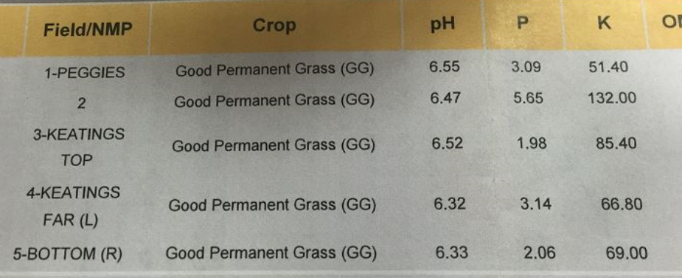
For grassland optimum fertility means a pH of between 6.2 -6.5 and a Soil Index of 3 for Phosphorous (P) and Potassium (K)
Soil sampling benefits
Therefore your soil sample forms the basis of your decisions where to apply slurry, FYM, lime and chemical forms of Phosphorous and Potassium for the 4 years ahead. If taken and used properly it will allow you to:
- Apply nutrients where they are required
- Avoid wasting nutrients by applying them where they are not needed
- Avoid causing a pollution risk by applying excessive nutrients to a field where they are not required.
- Achieve maximum growth rates by having optimal soil fertility i.e. a soil pH of 6.2 – 6.5, and Index 3 for Phosphorous (P) and Potassium (K).
There are also significant economic gains to be made by having soil at the correct level for pH, P & K as you optimise the efficiency of all nutrients therefore maximising growth rates for whatever crop you are growing, grass, cereal, beet, vegetables etc. Teagasc research shows by simply correcting the soil pH you can grow 20% more grass.
Therefore we need to make sure we take our soil samples properly. Like everything, the information that comes out is only as good as the information that goes in. Below are a 10 pointers on how to take a representative soil sample.

Soil Sampling 10 point plan
- Do not sample a field until at least 3 months after the last application of P and K and 2 years after the last application of lime.
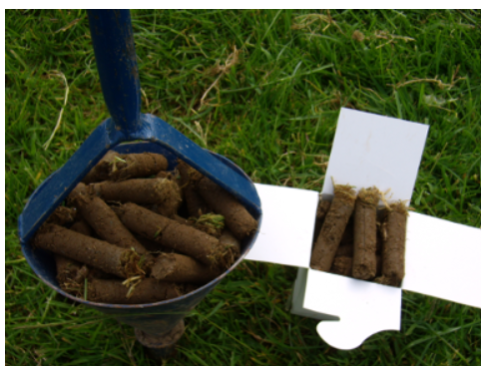
- Use a suitable soil corer and take cores to the correct sampling depth of 10cm (4”), this is where your grass roots are getting their nutrients from.
- Take a full core every time right down to the 10 cm, do not pick off the top or you will get an incorrect reading, particularly for Phosphorous as it is immobile and tends to stay in the top few centimetres of soil.
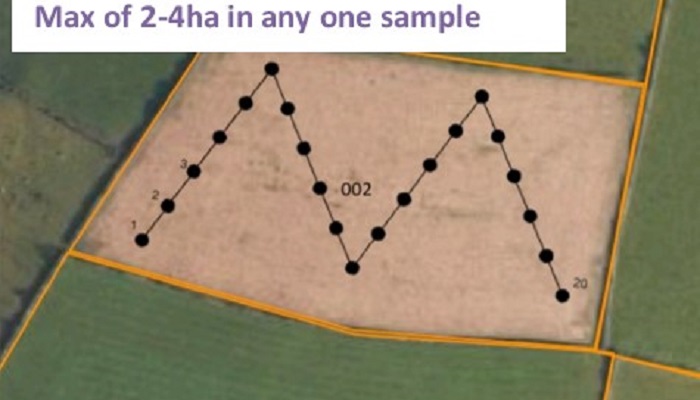
- Take a sample from 2- 4ha at most. To ensure the sample is representative, sample by walking in a W shaped pattern across the sampling area.
- Take a minimum of 20 soil cores, mix them together, and take a representative sub-sample for analysis, making sure the soil sample box is full.
- Avoid any unusual spots such as old fences, ditches, drinking troughs, gateways, dung or urine patches or where fertiliser / manures or lime has been heaped or spilled in the past.
- Take into account the previous cropping history. Sample grazing fields separate to silage fields as they are treated differently. Sample tillage fields separately and allow for soil type, slope, drainage or persistent poor yields.
- Sample fields at the same time of the year to aid comparisons of soil sample results. Avoid sampling under extremes of soil conditions e.g. waterlogged or very dry soils.
- Place the soil sample in a soil box to avoid contamination. Write the field name and number on the box with permanent marker. The field name is important for you as when you get the results back the field name will be on it. So when you pick up the result today or in three years’ time you know exactly where it’s from, you won’t need a map which will undoubtedly get lost. Also when resampling in four years it’s easier to compare samples. If you use an LPIS number this may change. You can use your BPS map to show your advisor where the sample is from.
- Repeat samples every 3-4 years to see if the actions you are taking to correct soil fertility are working. Derogation farmers must take a soil sample every 4 years from a maximum area of 5 ha
Teagasc provides a Nutrient management planning service – Talk to your advisor.
More information
For lots more information on soil sampling, the soil index system and interpreting your soil samples results, click on the link below. https://www.teagasc.ie/crops/soil–soil-fertility/soil-analysis/soil-sampling/
There are also two excellent videos to watch below
- Five steps to taking a soil sample by Edward Egan and Tara Heaney Teagasc Co. Meath article here
2. Soil Sampling by Mark Plunkett, Soil & Nutrition Specialist with Teagasc on why it’s so important to test your soil and the best way to do it.