Getting the Spread Right

Fertiliser is one of the most expensive inputs on the farm so you need to ensure that it is applied correctly, not only for your wallet but also for the environment. Here, Francis Quigley Teagasc Farm Machinery Specialist, talks about safety, checking the spreader, machine settings and calibration
Safety First
The most important task with any piece of farm machinery is a safety check. Give the spreader a good look over to ensure that there is no structural damage, and that all safety guards are in place. Check the tractor to ensure that it in tip top condition. If you are using big bags then you’re probably using a second tractor and loader, make sure to give it a thorough inspection.
Filling the hopper is the most dangerous part of the operation don’t put yourself at any risk while doing it. Ensure all the lifting gear is free of wear and check for any signs of cracks. Avoid putting yourself in any possible pinch positions, you don’t want to be trapped by a ½ tonne bag coming down or a tractor rolling forward.
Check the Spreader
The fertiliser spreader is a highly engineered piece of equipment, it is capable of accurately spreading a huge variety of fertiliser types to wider and wider working widths. It can only do this if it in excellent working condition. So you need to carry out a number of checks including
- Are the discs rotating smoothly, no play in bearings or gearbox
- Regulator mechanism moves freely, look for wear in linkages.
- Vanes are not damaged or worn
- Agitator is rotating
- PTO cover and chains are in place
- Headland control moves freely and fins are not bent
- Lights are working
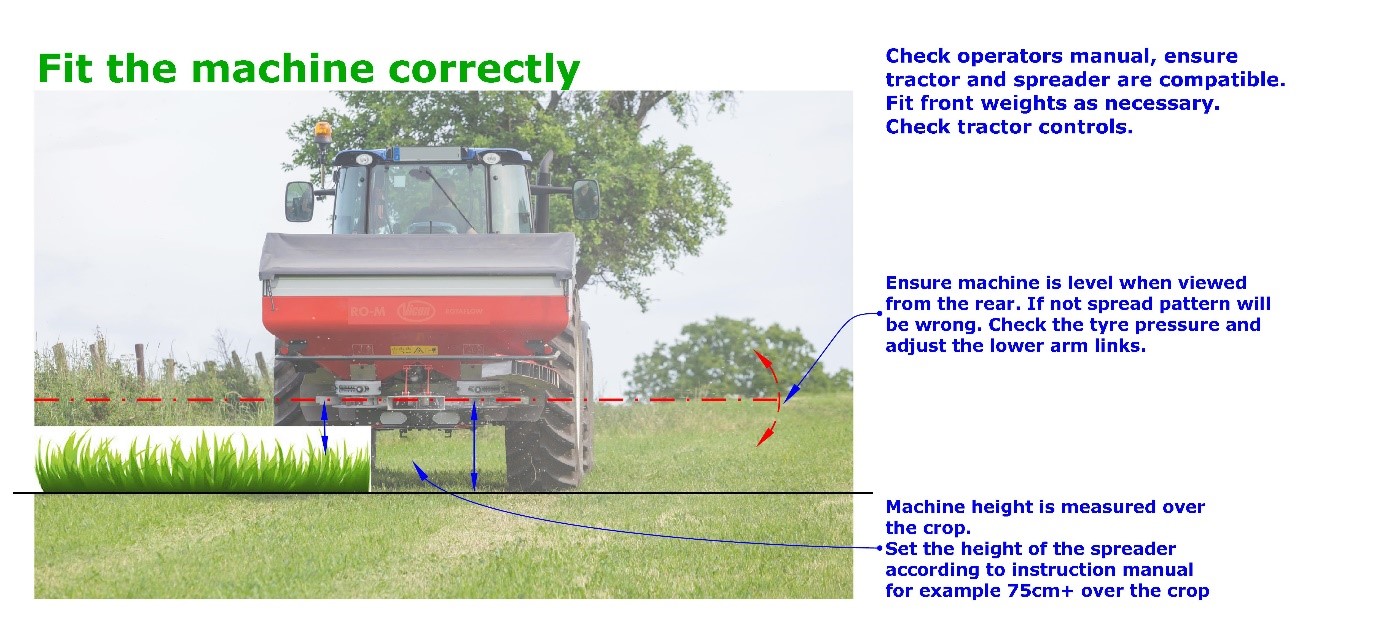
Fit the machine correctly
It is important to fit the machine correctly onto the tractor as this has a big bearing on the spread pattern. Make sure the spreader is suitable for the tractor, e.g. front weights may be needed. Check that the rear tyre pressures, need to be equal on both sides. The spreader needs to be level, when viewed from the back of the tractor. If it’s not the spread pattern will be uneven, adjust the droplink arms if needed.
The working height of fertiliser spreader is the next adjustment. The height is measured from the disc to the top of the crop, this measurement will vary depending on the machine and the working width so you need to check the manufactures guidance. If you can’t find the settings then a good guide is 75cm over the crop. Once the height is set, check the spreader is level from front to back. View the machine from the side, if it’s not level then you need to adjust the toplink to get it right. (There are some exceptions to this, so check the operator’s manual for your machine)
Machine Settings
Fertiliser grains will vary in weight, shape, size, hardness, and flow. In order to spread all of the different fertilisers accurately getting the settings right on the machine is very important. This is particularly important if you are moving to protected urea for the first time this season. The wider the working width the more important this is.
The first setting to adjust is the regulator. It will determine the flow rate, by changing the opening size at the bottom of the hopper. Fertilisers flow differently, so the regulator setting for 125Kg/ha will not be the same for all types.
Next we can look at the settings at the disc these will determine the spread pattern. Options include the disc choice, the vane angle and length, the drop point of the fertiliser and the front to back angle of the discs. Your fertiliser spreader will have come with a book of tables which will give you these settings for a range of different fertilisers but these can be confusing to use. Thankfully most manufactures now have a smart phone app available to help with finding the correct settings, and I highly recommend that you download the app for your fertiliser spreader and use it.
Calibration
It is important to check the spreader after it has been setup. To do this you need to calibrate the machine. The calibration method of most manual twin disc spreaders involves removing one of the discs, placing a bucket under the machine and then running the machine for 30 seconds. Fertiliser is collected in the bucket and then weighed. The amount collected should be same as the desired flow rate, a figure given to you by the phone app. If it is not correct then adjust the regulator and carryout the test again. (High spec machines with built in weights cells will carry out this calibration several times per second.)
In order to check you have the vane settings correct you will need to carry out a tray test in the field. This is done by laying out a number trays at equal distance from each other across a full bout width. Then you can drive over and back across the trays spreading fertiliser as you would normally. If the settings are correct the volume of fertiliser collected in each tray should be the same. All machines even high spec models should be checked in the field with a tray test.

Operation
The other variable in the spreading process is the driver, it is of little use getting all of the settings right if the operator is not driving correctly in the field. Maintaining an accurate forward speed and bout width is vital, it is no use trying to guess these in the field. Forward speed can be calibrated, but consistent bout width is harder to check and maintain. A basic GPS guidance system is almost a must have item when using any modern fertiliser spreader. It will ensure that the bout width and the forward speed can be maintained accurately by the operator.
If you liked this article you might also like What is a GPS Fertiliser Spreader? by Francis Quigley
For more on the topic of fertiliser spreading read Spread Accurately and Evenly (by Dermot Forristal, Teagasc Oakpark)